
It all starts with a piece of wood. From there, the magic happens. Our skilled craftsman takes a block of wood and creates something truly special - a wooden clock that is both beautiful and functional. We are constantly asked how we make our clocks, so we decided to put together this step by step guide detailing the process.
See a full build video we produced below along with further reading on the step process. Enjoy!
1. Buying our timber
We're quite lucky. We live on the outskirts of Derbyshire and have a small selection of independents that sell rough sawn white Oak, which is our most popular wood. Our main vendor is a small farm about 7 miles away that stock 25mm thick boards which are 3 meters longs and vary in width. Stewart, the farmer is a super friendly guy and always helps us load up the van.

This is what we're interested in! Its rough sawn green Oak and is stacked up in all sorts of grades. We usually sort through these stacks to find the best bits. We look for wood that isn't cupped or bent, is uniform in thickness and has no splits at the end or through the centre. We also look out for spalted oak (click the link to understand), which is wood that has lots of character and swirly colour gradients. It takes a while to settle on the planks we like but it's always worth the effort.
Exotic wood?
Further afield, closer to Stoke and about 40 minutes away we have the exotic hardwood centre who cater for musical instrument builders and resin table enthusiasts. They're fantastic! and they have some of the most amazing wood types you can think of from all over the world. Here we buy our African Zebrano, the Black American Walnut, Mahogany and many more. I love to spend the day browsing through all their amazing stock as well as baulk at the price of some of the rarer varieties on sale. Generally their timber is of better quality and usually takes less processing, BUT! The exotic timbers are much more expensive. They're imported from far away lands and carry shipping and import levies. They're very unique and special but its the cost you pay for very exclusive materials. You can find them at exotic hardwood guys

2. Cutting to length
We cater for two main size of clock face, 36cm and 45cm. We chose these mainly because of machine constraints and our ability to dry the timber effectively in a reasonable time, which we'll talk about next. To cater for these clock dimensions we cut our 3 meter length boards into 40cm and 50cm long respectively. This allows some edge waste to be fixed into the machines and prevent movement while we work on it.

3. Drying our Timber
Once we're back from our trip to the timber merchant we can't start working with the wood right away. The White Oak which we primarily buy from our friend Stewart (the farmer) is only air dried. This means they stack it up, usually outside for 9 months to a year after the tree has been cut down and sliced up. This takes the moisture level of the wood from over 50% down to about 25%. I know this because I test it with a moisture meter.

Wood with a 25% moisture content is not suitable for use in the average home. We need to dry it further. The average home has a relative humidity level which is much lower than that of outside. We need to bring the moisture level down to around 8~10% to be on the safe side. Wood with too much moisture will dry out further when stored indoors. This can create problems like cracking and warping and we really don't want that to happen to our wonderful wood wall clocks, certainly not after all the effort we put in to make them look so pretty!
So, what do we do to achieve this? Well, we could stack it up for another year indoors and wait for nature to take its course and reach our magic number. But we don't do that. Its way too inefficient and we would end up with piles of drying wood that we would need to rotate through as we use it.
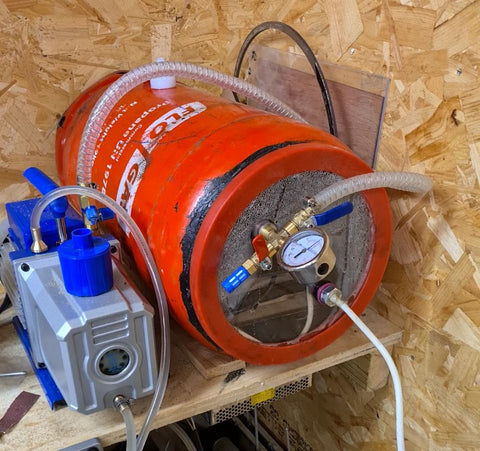
Instead we applied a bit of science to speed up the process. This involves an air tight chamber, some heat and a vacuum. If you didn't already know, water boils and evaporates at 100c. So just heat up the wood to 100c to boil off the water right? No. If you do this then strange things start happening and the wood starts to warp and split. The ideal way of doing it is to gently heat the wood to ~40c and apply a vacuum. Applying a vacuum has the effect of lowering the boiling point of water. You can even freeze water at room temperature if you put it under enough vacuum. This is also why clouds form high up in the sky. There is less pressure up high and it turns to water vapour. So by using this approach we boil the water at a lower temperature in a vacuum which extracts all the water from the wood.
To do this we had to build a kiln from scratch and automate the drying process by use of a vacuum pump and heating matts in a steel chamber.
Its so efficient that we can dry our lumber from 25% moisture content down to about 8% within 24 hours! Cool right!
And to really hammer home just how much water comes out of the wood in a 24hr period. Here we have 3x 500mm long planks of English white Oak and the water that was extracted in that process (approx 350ml)

4. Thickness & Flattening
Next we need to ensure that the wood we have is all the same thickness. This is essential for the next step to work.
We often have to settle on wooden planks that are cupped or slightly mis-shaped. Its just the way nature is. Here's an example of a typical cupped piece of Oak from our dry pile.

We need to get that as flat as we can so we don't end up with clocks that look out of shape. We use a machine called a thicknesser planer which we pass the wood though multiple time to get the desired uniform dimensions.

5. Jointing and glue up
As we previously mentioned in step one. We buy our Oak in boards widths of approximately 200mm (8") and we sell clocks up to 460mm in width. We achieve this by gluing together as many boards as we need (up to 3 in total) to gain that width dimension.

Once we're happy with the flattened faces and the boards are the same thickness we need to mill down the edges perfectly flat. Doing so allows the board edges to butt together very closely and create a seamless surface of beautiful wood.
We apply a top quality glue to the edge of each board and clamp them together tightly for 24hrs until the glue bonds the pieces of wood together.

6. Sanding and prepping
Its been 48hrs since we brought the timber into the workshop. We've not even begun to create the clock yet!
Now that we have an almost square slab of timber with the slightly oversized dimension of the clock size we need. We can begin to prepare it for the machining process. We start by sanding down the faces to ensure that any seams between the wood are ground out and merge together to become almost invisible. Then we might take a planer and level out any high or low spots created from any underlying twist in the lumber that couldn't be addressed with the thickness planer. Its only then that we can lie it flat on the CNC bed to begin the machining process.
7. CNC machining
As I write this. I do so as an engineer of 20 years having been mainly involved in the electronic industry. My interests however have always swung much wider into other areas. I am quite proud to say that I have always enjoyed the many facets of engineering which has guided me towards the love of working with wood over the years. So much so that I decided to build my own CNC machine when the urge to have one became much too high. I wanted the challenge and eventually went on to create the machine I still use today.
Every aspect of the machine is created from scratch, including the electronic control box you see below. The whole system is web based using a raspberry pi and Arduino which runs all the machine control.
The control box


The main machine deck is built using 12mm thick T6 aluminium plate all cut and drilled by hand using laser cut jigs to ensure accurate dimensions. Its been an absolute pleasure to bring this creation to life, and I have to say, is by far the greatest tool in my workshop!
The CNC bed and milling head


I realise I've digressed somewhat from the main topic but it really is one of my proudest achievements and feel I should share that with the world.
I could write a whole other blog post about the learning curve associated with running a CNC but I'll keep it focused for the sake of this post :o)
Designs
Before the machine can do anything, you need to tell it how to move. And to do that you first need to be able to model objects in 3D. There are many software packages out there that you can do this with, I won't go into it here but I have my favorite and it works well enough for my need. So using these 3D modelling packages you can create a shape, with specific dimensions and artefacts. Then you specify how you want the machine to cut out those shapes and dimensions depending on the tool you want to use and how fast you want it to do it. I've over simplified the process somewhat but those are the broad brushstrokes.
So I've come up with a few models and we can convert all these models with instructions into a file that the machine understands and further converts in to X,Y,Z axis (Side to side, forward and back, up and down)
Below on the left is a typical 3D view from the modelling software where I have given it parameters of where to cut and how deep. To the right is how my machine sees a typical skeleton clock face that needs to be hollowed out. You can see that it has created a spiral pattern that radiates from the centre outward. This is the path that the cutting head will follow during this process and there can be multiple processes all with different tools.


The end result from what we see in the right hand picture after all three stages have been complete is the clock body cut out from the flat Oak slap we created from the gluing process

For enjoyment, and if you're interested to see the process. I have distilled this down into a short(ish) video where I break down the machining process and you get to see how it happens. This particular video is for a different design to that we're describing here but the main process is the same.
8. Laser cutting
Ok, so I only need this process for certain clocks. Mainly for the circular types where I can laser cut a pattern from plywood sheet or MDF and for engraving. You can see this prominently on our Solid Oak Skeleton clocks . We use an 80w Co2 laser to cut through up to 10mm of wood at a time!
Our laser was actually the first step into CNC machines and again, yes, it is self built from scratch. Being the first foray into the world of machines, I didn't realise this was actually the most expensive to maintain and run. Those laser tubes are not cheap!

Forgetting for a moment that they're very dangerous if operated without care. They also have lots of mirrors and lenses to bounce the laser light around the machine until it hits its target. The slightest knock or nudge can usually misalign some element of the system and causes hours of maintenance getting the system re-aligned. But all this is very worth while when you realise the incredible things you can create using it. In my case, as hinted to above, I used it to create all the cutting jigs for the parts to create my CNC machine. The laser can cut to within fractions of a millimetre, so all the holes and angles which were required and needed to be perfect were cut on the laser.
Creating great looking clock faces is just another string to its bow. Again, another type of design software is needed, mainly to cater for 2D drawing rather than 3D but the concept is still the same and we end up with results like below after we've given it several coats of black paint.

9. Finishing
Its doesn't stop there. We've now got a freshly made clock face body honed from solid Oak. To bring out all that lovely grain character and make it, POP. We need to add some treatment that will also aid in preserving the timber.
We use multiple types of preservations. And if I am honest, I don't have a firm favourite. But what I do gravitate to are traditional style wood treatments such as oils and shellac. The oils tend to give a matt style finish which looks deep and gives the timber a wet look without being too shiny. But the shellac, which by the way is made of tree bug saliva, is able to penetrate deep and dry off to provide better preservation without smelling too much. They both have their positives and negatives but it all depends what I want to achieve from the look and feel.
If you managed to sit through the video above then you will see the process where I apply the oil with a rag and how it brings out the wood character in in full. And it a very satisfying stage.
What we end up with is a beautiful solid Oak wall clock ready to send out to a happy customer.

Click the image above to see out full collection
10. Quality inspection
The last step is probably the most important and we would be silly to skip this. Our very own in house inspection beagle gives it the sniff test and a quick kiss before we box up the clock and ship out. Molly is highly trained and nothing gets past her super sensitive nose. We're proud to have her around so allow us to introduce our very own QC, Molly.

3 comments
Thanks a million for sharing your decades of experience with us. I help my brother in his small factory making wooden wall clocks in Kabul, Afghanistan. My brother started to make CNC machines himself. We started production two years ago but the government collapsed and we stopped. We are back but the country’s economy has collapsed. However, we have finalized a few designs of clocks using walnut wood and two other types of wood that I don’t know the name in English. We have so many challenges. I will be using your site to gain some knowledge and experience.
Bashir
Undoubtedly, a thorough and accurate job.
Amazing!
You gave those slabs a significant value, and thanks for having shared the entire crafting process, often it’s just by looking “behind the scenes” that people out there can grab that value.
Congrats and keep up your great job!!